Debugging CH32V307V with Visual Studio Code on macOS

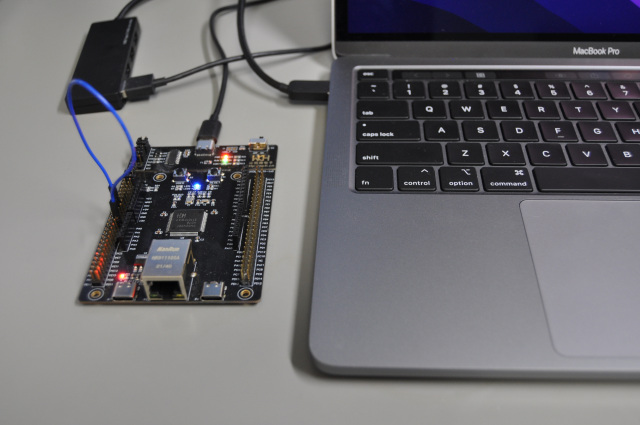
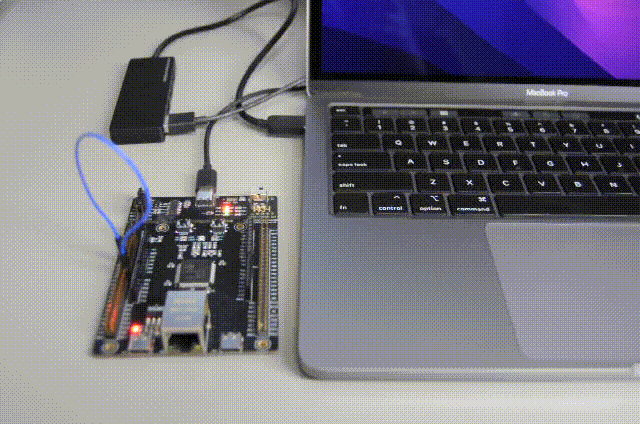
As the final testing of the CH32V series RISC-V MCU development environment on Mac, I tried whether I could debug a program running on WCH’s CH32V307RCT6 evaluation board (CH32V307V-EVT-R1) or not with Visual Studio Code in the same way as I did before on my Ubuntu 20.04 environment.

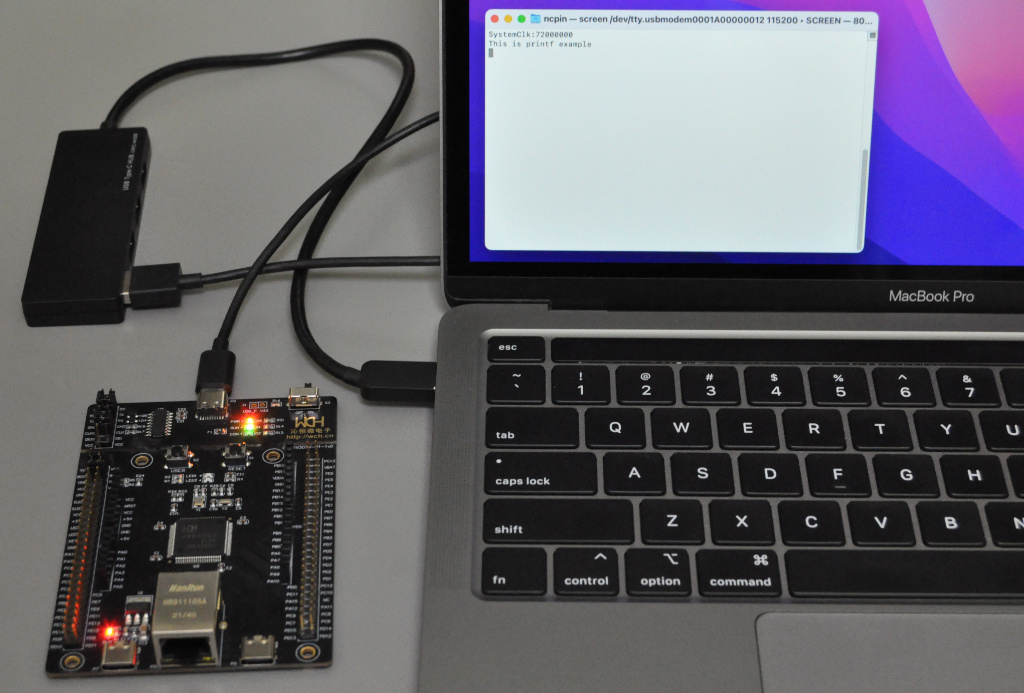
I tested Visual Studio Code using the same CH32V307 example as the previous post. This time, to generate debugging information, I added -g and -O0 to the GCC options in the Makefile (Here is the updated file) and rebuilt the example.

After installing Visual Studio Code to my MacBook Pro (intel, 13inch, 2020), I added the Native Debug extension by WebFreak.

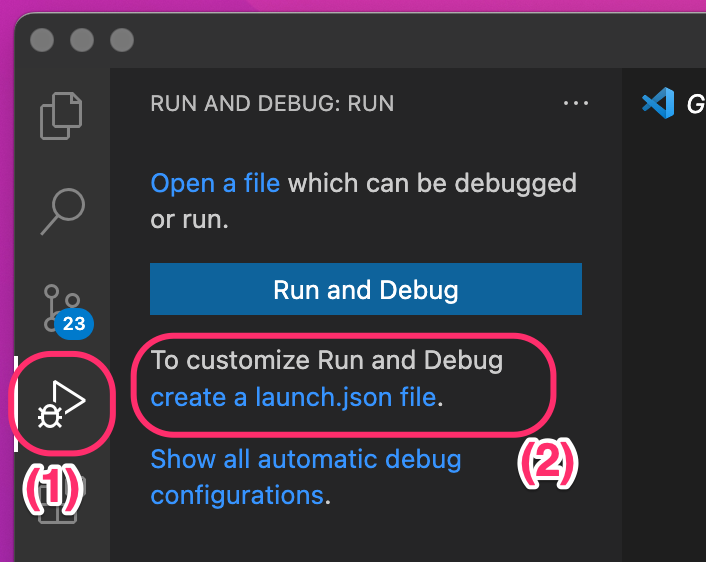
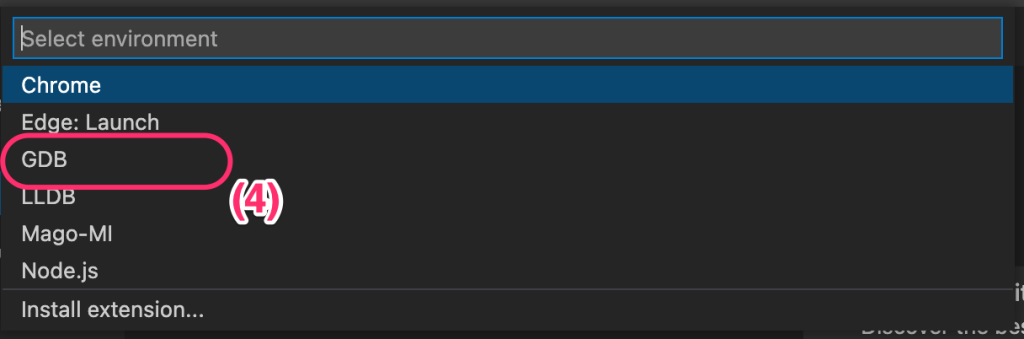
I saved a workspace of Visual Studio Code into the ch32v307/EVT/EXAM/GPIO/GPIO_Toggle/User directory and added this directory to the workspace also. Then I created a launch.json file by clicking create a launch.json file(1), (2) and selecting the workplace (3) and GDB(4) items.

I replaced the contents of the created JSON file with the following.

{
	"tasks": {
		"version": "2.0.0",
		"tasks": [
			{
				"label": "run_openocd",
				"type": "process",
				"isBackground": true,
				"command": "${userHome}/csfs/openocd/openocd",
				"args": ["-f", "${userHome}/csfs/openocd/wch-riscv.cfg"],
				"problemMatcher": [
					{
					  "pattern": [
						{
						  "regexp": ".",
						  "file": 1,
						  "location": 2,
						  "message": 3
						}
					  ],
					  "background": {
						"activeOnStart": true,
						"beginsPattern": ".",
						"endsPattern": ".",
					  }
					}
				  ]
			}
		]
	},
	"folders": [
		{
			"path": "."
		}
	],
	"launch": {
		"version": "0.2.0",
		"configurations": [
			{
				"name": "gdb-openocd",
				"type": "gdb",
				"request": "attach",
				"executable": "gpio_toggle.elf",
				"remote": true,
				"target": ":3333",
				"cwd": "${workspaceRoot}",
				"gdbpath": "${userHome}/csfs/x-tools/riscv32-unknown-elf/bin/riscv32-unknown-elf-gdb",
				"preLaunchTask": "run_openocd",
				"autorun": [
					"set mem inaccessible-by-default off",
					"set architecture riscv:rv32",
					"set remotetimeout unlimited",
					"monitor reset halt",
					"load"
				]
			}
		]
	}
}

Before starting the debugging with Visual Studio Code, I mounted the disk image I made in a new Terminal window.

hdid -nomount csfs.sparseimage
mount -t hfs /dev/disk2s2 csfs
export PATH="$HOME/csfs/x-tools/riscv32-unknown-elf/bin:$HOME/csfs/openocd:$PATH"

Then I added the following line to the end of OpenOCD’s config file $HOME/csfs/openocd/wch-riscv.cfg to avoid the Restart and Disconnection issue I found when I tried to run Visual Studio Code on Ubuntu.

$_TARGETNAME.0 configure -event gdb-detach { shutdown }

I set a breakpoint in main.c and started debugging by selecting the Start Debugging (F5) item under the Run menu.

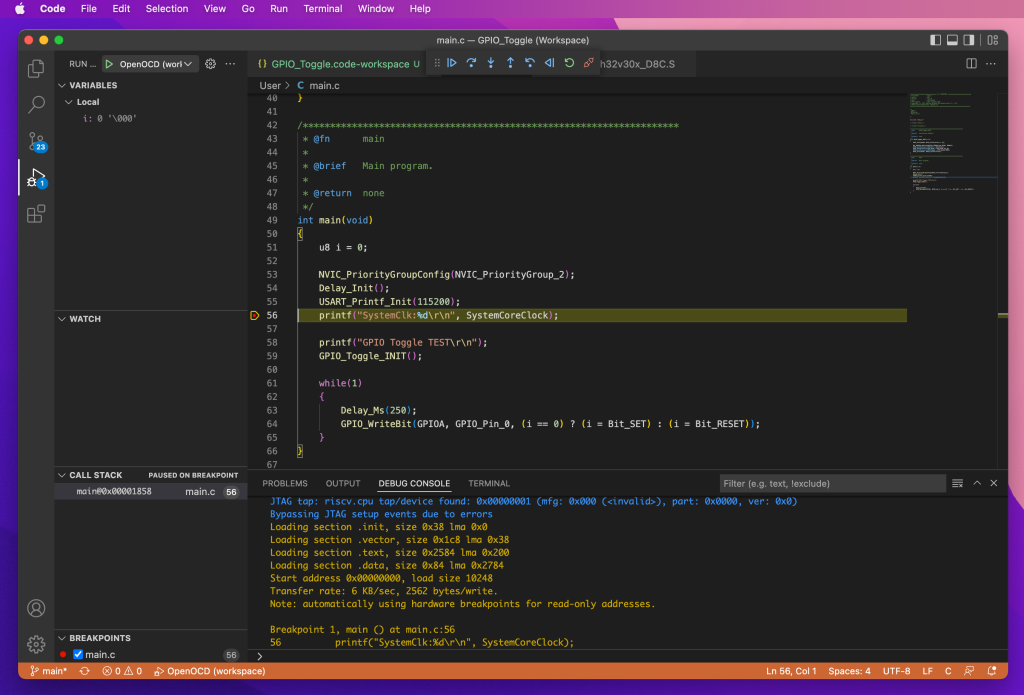
As far as I tested briefly, debugging on Visual Studio Code worked pretty well. This time I was able to figure out a way to avoid the Restart (Ctrl+Shift F5) and Disconnect (Shift+F5) operation issues that I found when I tried Visual Studio Code on Ubuntu by modifying OpenOCD’s config file and defining preLaunchTask to the Visual Studio Code setting.

[Added on 2022-07-08]
I uploaded my ch32v307/EVT/EXAM/GPIO/GPIO_Toggle/ directory as the tgz file just for reference. My Visual Studio Code project file (GPIO_Toggle.code-workspace) with the above setting is also included in the tgz file.

Testing the toolchain for RISC-V on macOS

I tested the toolchain for RISC-V that I built on my Mac with WCH’s CH32V307RCT6 evaluation board (CH32V307V-EVT-R1). I used the GPIO toggle sample in the opencwch/ch32v307 repository on GitHub. At first, I mounted the disk image I made in the previous post.

hdid -nomount csfs.sparseimage
mount -t hfs /dev/disk2s2 csfs

This time I copied the openocd binaries that I also made before and the necessary file under a newly-created csfs/openocd directory. I added paths for the toolchain and the openocd binaries to the PATH environment variable.

export PATH="$HOME/csfs/x-tools/riscv32-unknown-elf/bin:$HOME/csfs/openocd:$PATH"

I cloned the opencwch/ch32v307 repository from GitHub

git clone https://github.com/openwch/ch32v307.git
cd ch32v307/EVT/EXAM/GPIO/GPIO_Toggle/User

I created a Makefile in the ch32v307/EVT/EXAM/GPIO/GPIO_Toggle/User directory. Then I built the GPIO_Toggle example and flashed a resulted hex file to the CH32V307RCT6 evaluation board.

make
openocd -f $HOME/csfs/openocd/wch-riscv.cfg -c init -c halt -c "program gpio_toggle.hex" -c exit

I connected the PA0 pin and the LED1 pin in the J3 header using a jumper wire to see toggling of the GPIO PA0 port as the blinking of the LED1. After flashing the hex file by the openocd, by pressing the reset button on the evaluation on board I saw the following LED blinking.

After testing the toolchain, I used the following command to unmount the disk image that I mounted under the csfs directory.

hdiutil detach /dev/disk2s2

OpenOCD for CH32V series on macOS

I have been using Ubuntu 20.04 to test the OpenOCD and the toolchain for the CH32V series RISC-V MCUs. It worked as expected for me, and I was also interested in whether I could do the same thing on my Mac.
To start investigating the development environment of the CH32V series MCUs on Mac, I tried to build the OpenOCD using the source codes from the same GitHub repository that I used before.

At first, I installed Homebrew according to the instruction on the top of the Homebrew page. I used MacBook Pro (intel, 13inch, 2020), and the OS version was macOS Monterey (Version 12.3.1).

/bin/bash -c "$(curl -fsSL https://raw.githubusercontent.com/Homebrew/install/HEAD/install.sh)"

After installing Homebrew, I added the following packages using the brew command.

brew install libtool automake pkg-config libusb hidapi

I cloned the OpenOCD repository in the same way as before.

git clone https://github.com/kprasadvnsi/riscv-openocd-wch/<br>cd riscv-openocd-wch

I applied one modification to the file src/jtag/drivers/wlink.c as follows.

sed -i '' -e '103s/^/void wlink_ramcodewrite(uint8_t *buffer, int size);\n/' src/jtag/drivers/wlink.c

This modification adds the function prototype of wlink_ramcodewrite() before the program calls the function for the first time in the wlink.c.
As I wrote in my old post, the compiler only outputted the warnings when I built the same source codes without the modification under the Ubuntu 20.04 environment. However, the compiler outputted errors without the above modification with the macOS environment. I could not figure out how to make the error into the warnings just by specifying additional compiler options. Thus I have decided to apply the patch directly to the source.
After applying the modification, I built the OpenOCD as follows.

./bootstrap<br>./configure CFLAGS="-Wno-error" --enable-wlink<br>make

I downloaded the same MRS_Toolchain_Linux_x64_V1.40.tar.xz from MounRiver’s download page as before and extracted the tar.xz file.

cd ~/Downloads<br>tar Jxvf MRS_Toolchain_Linux_x64_V1.40.tar.xz

I went back to the riscv-openocd-wch/src directory where I built the OpenOCD binary again. I copied the wch-riscv.cfg file to this directory from the extracted MRS_Toolchain_Linux_x64_V1.40 directory.

cp ~/Downloads/MRS_Toolchain_Linux_x64_V1.40/OpenOCD/bin/wch-riscv.cfg .

I tested my OpenOCD binary with WCH’s CH32V307RCT6 evaluation board (CH32V307V-EVT-R1). Erasing, programming and verifying operations were all worked.

Program

./openocd -f wch-riscv.cfg -c init -c halt -c "program CH32V307RCT6.hex" -c exit

Erase

./openocd -f wch-riscv.cfg -c init -c halt -c "flash erase_sector wch_riscv 0 last" -c exit

Verify

./openocd -f wch-riscv.cfg -c init -c halt -c "verify_image CH32V307RCT6.hex" -c exit

Reset

./openocd -f wch-riscv.cfg -c init -c halt -c wlink_reset_resume -c exit

I checked with the same CH32V307RCT6.hex file as before. I used the screen command to see the UART output from the CH32V307.

screen /dev/tty.usbmodem0001A00000012 115200

Note
The device name /dev/tty.usbmodem0001A00000012 might vary depending on the environment. The actual device name should be able to be obtained by the ls command.

ls /dev/tty.usbmodem*

To quit from the screen command, you need to press control + a and k first. Then you will see the prompt Really kill this window [y/n] and press y to finish using the screen command.

OpenOCD for CH32V series

I happened to know that there is a repository for OpenOCD for CH32V series MCUs.

https://github.com/kprasadvnsi/riscv-openocd-wch

From the following tweets, it looks that the source code in this repository was coming from MounRiver.

https://mobile.twitter.com/kprasadvnsi/status/1508643293176872962

Of course, we can flash CH32V series MCUs using tools that we can download from MounRiver’s site for free. But these tools are all only provided in binaries at this moment. I also could not find any clear instructions on how to build and use the tool in the above repository. I believe that having options to build important tools like a flash programming tool for an MCU – in this case, OpenOCD – is important.

I tried to build and test the OpenOCD in the above repository on my Ubuntu 20.04 installation to get an idea of what we can do with this code. Luckily I was able to build without a major issue and flash an actual CH32V307. So I decided to report my trial on this blog.

The following is the record of my trial on Ubuntu 20.04.

sudo apt install git make libtool texinfo libusb-1.0-0-dev libhidapi-dev libjaylink-dev<br>git clone https://github.com/kprasadvnsi/riscv-openocd-wch/<br>cd riscv-openocd-wch/<br>./bootstrap<br>./configure CFLAGS="-Wno-error" --enable-wlink<br>make

I saw many warnings during the build, but the above procedure gave me the OpenOCD binary under the src/ directory.

To be able to access a WCH-Link (WCH’s USB flash programmer for CH32V series MCUs) from Ubuntu, I went to MounRiver’s download page and downloaded MRS_Toolchain_Linux_x64_V1.40.tar.xz in the “Linux” tab. Then I uncompressed the downloaded file, copied an udev rule file, and reloaded the newly added rule file.

cd ~/Downloads
tar Jxvf MRS_Toolchain_Linux_x64_V1.40.tar.xz
sudo cp ~/Downloads/MRS_Toolchain_Linux_x64_V1.40/beforeinstall/50-wch.rules /etc/udev/rules.d/
sudo udevadm control --reload-rules

I went back to the riscv-openocd-wch/src directory where I built the OpenOCD binary again. I copied the wch-riscv.cfg file to this directory from the MRS_Toolchain_Linux_x64_V1.40 directory.

cp ~/Downloads/MRS_Toolchain_Linux_x64_V1.40/OpenOCD/bin/wch-riscv.cfg .

I tested my OpenOCD binary with WCH’s CH32V307RCT6 evaluation board (CH32V307V-EVT-R1). Erasing, programming, and verifying operations were all worked.

Program

sudo ./openocd -f wch-riscv.cfg -c init -c halt -c "program CH32V307RCT6.hex" -c exit

Erase

sudo ./openocd -f wch-riscv.cfg -c init -c halt -c "flash erase_sector wch_riscv 0 last" -c exit

Verify

sudo ./openocd -f wch-riscv.cfg -c init -c halt -c "verify_image CH32V307RCT6.hex" -c exit

Reset

sudo ./openocd -f wch-riscv.cfg -c init -c halt -c wlink_reset_resume -c exit

Note
CH32V307RCT6.hex is the firmware file I used to test the programming and verifying operations for CH32V307RCT6.
[Added on 2022-05-03] I generated this hex file from MounRiver Studio’s project template for CH32V307RCT6. After booting up, this firmware will output the following message to the UART.

SystemClk:72000000
This is printf example